 pytest自动化测试框架
# pytest自动化测试框架
# 代码地址
https://github.com/xiaorui16888/AutoTest_Note
# 前言
pytest是一个非常成熟的python的单元框架,比unittest更灵活。
# 特点
pytest可以和selenium,requests,appium结合实现web自动化,接口自动化,app自动化。
pytest可以实现测试用例的跳过以及reruns失败用例重试。
pytest可以和allure生成非常美观的测试报告。
pytest可以和Jenkins持续集成。
# 插件
pytest有很多非常强大的插件,并且这些插件能够实现很多的实用的操作。
pytest-xdist:测试用例多线程或分布式执行
pytest-ordering:用于改变测试用例的执行顺序(从上到下)
pytest-rerunfailures:用例失败后重跑
pytest-html:生成html格式的自动化测试报告
allure-pytest:用于生成美观的测试报告
# 测试用例规则
1.模块名必须以test_开头或者_test结尾
2.测试类必须以Test开头,并且不能有init方法
3.测试方法必须以test开头
# 运行方式
# 主函数模式
1.运行所有
pytest.main()
2.指定模块
pytest.main(['-vs','test_login.py'])
3.指定目录
pytest.main(['-vs','./interface_testcase'])
4.通过nodeid指定用例运行:nodeid由模块名,分隔符,类名,方法名,函数名组成。
pytest.main(['-vs','./interface_testcase/test_interface.py::test_04_func'])
# 命令行模式
1.运行所有
pytest
2.指定模块
pytest -vs test_login.py
3.指定目录
pytest -vs ./interface_testcase
4.指定nodeid
pytest -vs./interface_testcase/test_interface.py::test_04_func
2
# 参数详解
-s:表示输出调试信息,包括print打印的信息
-v:显示更详细的信息
-vs:这两个参数一起用
-n:支持多线程或者分布式运行测试用例。如:pytest-vs./testcase/test_login.py-n2
--reruns NUM:失败用例重跑
-x:表示只要要一个用例报错,那么测试停止。
--maxfail=2出现两个用例失败就停止。
-k:根据测试用例的部分字符串指定测试用例。
如:pytest-vs./testcase-k"ao"
--html ./report/report.html:生成html的测试报告。
-m xxx :表示只运行xxx标签的用例
# 通过读取pytest.ini全局配置文件运行
pytest.ini这个文件它是pytest单元测试框架的核心配置文件。
1.位置:一般放在项目的根目录
2.编码:必须是ANSI,可以使用notpad++修改编码格式。
3.作用:改变pytest默认的行为。
4.运行的规则:不管是主函数的模式运行,命令行模式运行,都会去读取这个配置文件。
[pytest]
addopts = -vs #命令行的参数,用空格分隔
testpaths = ./testcase #测试用例的路径
python_files = test_*.py #模块名的规则
python_classes = Test* #类名的规则
python_functions = test #方法名的规则
markers =
	smoke:冒烟用例
	usermanage:用户管理模块
	wechat:微信模块
2
3
4
5
6
7
8
9
10
# pytest执行测试用例的顺序
默认从上到下
若需要改变执行顺序:使用mark标记
@pytest.mark.run(order=3)
# 如何分组执行
pytest -m "smoke"
pytest -m "smoke or usermanage or wechat"
2
# 跳过测试用例
# 无条件跳过
@pytest.mark.skip(reason="无条件")
# 有条件跳过
@pytest.mark.skip(age>18,reason="已成年")
# 前后置
# setup、teardown、setup_class、teatdown_class
class TestUser:

    def setup_class(self):
        print('每个类之前执行一次')
        print('在每个类执行前的初始化的工作:比如:创建日志对象,创建数据库的连接,创建接口的请求对象。')

    def teardown_class(self):
        print('每个类之后执行一次')
        print('在每个类执行后的扫尾的工作:比如:销毁日志对象,销毁数据库的连接,销毁接口的请求对象。')

    def setup(self):
        print('每个用例之前执行一次')
        print('在执行测试用例之前初始化的代码:打开浏览器,加载网页')

    def teardown(self):
        print('每个用例之后执行一次')
        print('在执行测试用例之后的扫尾的代码:关闭浏览器')

     def test_01_login():
        print('test_01_login')
2
3
4
5
6
7
8
9
10
11
12
13
14
15
16
17
18
19
20
21
# @pytest.fixture()装饰器
@pytest.fixture(scope="",params="",autouse="",ids="",name="")
scope:@pytest.fixture标记的方法的作用域。
function(默认),class,module,package/session.
params:参数化(支持,列表[],元祖(),字典列表[{},{},{}],字典元祖({},{},{})
autouse=True:自动使用,默认False
ids:当使用params参数化时,给每一个值设置一个变量名。一般是用不到的~
name:给表示的是被@pytest.fixture标记的方法取一个别名。当取了别名之后,之前的名称就不可以使用了。
import pytest

@pytest.fixture(scope='function', params=["user1", "user2", "user3"])
def my_fixture(request):
    print(request.param)
    print('执行sql语句')
    yield request.param
    print('关闭数据库连接')

class TestUser:

    def test_d(self, my_fixture):
        print('test_d===' + my_fixture)
2
3
4
5
6
7
8
9
10
11
12
13
# 通过conftest.py和@pytest.fixture()结合使用
如:全局登录,模块的全局处理
1.conftest.py文件是单独存放的一个夹具配置文件,名称是不能更改。
2.用处可以在不同的py文件中使用同一个fixture函数。
3.原则上conftest.py需要和运行的用例放到统一层。并且不需要做任何的imprt导入的操作。
# 总结
setup/teardown,setup_class/teardown_class它是作用于所有用例或者所有的类
@pytest.fixtrue()它的作用是既可以部分也可以全部前后置。
conftest.py和@pytest.fixtrue()结合使用,作用于全局的前后置。
# allure-pytest插件(测试报告)
使用allure,不仅需要pip install allure-pytest,还需要安装allure,并且配置环境变量。
1.下载,解压,配置path路径。
https://github.com/allure-framework/allure2/releases
2.打开cmd,allure --version
这样就ok了
如果cmd窗口验证成功,pycharm提示找不到allure,重启pycharm即可
3.加入命令生成json格式的临时报告。
--alluredir ./temp
4.生成allure报告
os.system('allure generate ./temp -o ./report --clean')
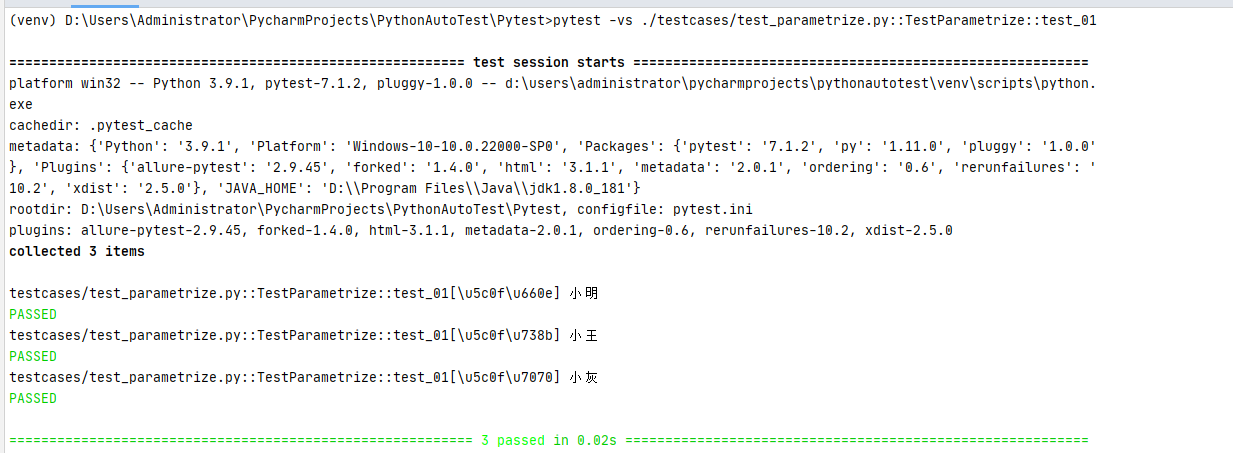
# @pytest.mark.parametrize()基本用法
@pytest.mark.parametrize(args_name,args_value)
args_name:参数名
args_value:参数值(列表,元祖,字典列表,字典元祖),有多个值用例就会执行多少次
# 方式一
@pytest.mark.parametrize('caseInfo', ['小明', '小王', '小灰'])
def test_parametrize(self, caseInfo):
   	print(caseInfo)
2
3

# 方式二
跟unittest里面的ddt--@unpack解包一样
@pytest.mark.parametrize('name,age', [['小明', '21'], ['小王', '22'], ['小林', '23']])
def test_02(self, name, age):
    print(name, age)
2
3

# YAML文件--实现接口自动化
1、可以做配置文件
2、可以写测试用例(接口测试)
yaml是一种数据格式,支持注释,换行,多行字符串,裸字符串(整形,字符串)。
# 语法规则
1.区分大小写
2.使用缩进表示层级,不能使用tab键缩进,只能用空格(和python一样)
3.缩进没有数量的,只要前面是对其的就行。
4.注释是 #
其实我用tab键已经习惯了,在pycharm里面用tab代替空格好像也没事...
# 数据组成
Map对象,键值对
List数组,-开头
# 代码实现
这里其实没什么用文字去叙述的,我直接贴代码了
读写yaml工具类
import yaml


class ReadConfig:
    def __init__(self, yaml_file):
        self.yaml_file = yaml_file

    def read_yaml(self):
        with open(self.yaml_file, encoding='utf-8') as f:
            file_dict = yaml.load(stream=f.read(), Loader=yaml.FullLoader)
            print(file_dict)

    def write_yaml(self, data):
        with open(self.yaml_file, encoding='utf-8', mode='w') as f:
            yaml.dump(data=data, stream=f, allow_unicode=True)


if __name__ == '__main__':
    # rc = ReadConfig('config.yaml')
    # rc.read_yaml()
    # rc.write_yaml({'User': {'name': '小睿', 'age': 24}})

    api_config = ReadConfig('api.yaml')
    api_config.read_yaml()
2
3
4
5
6
7
8
9
10
11
12
13
14
15
16
17
18
19
20
21
22
23
24
25
测试用例类
# -*- coding: UTF-8 -*-
"""
@Project :PythonAutoTest
@File    :inter.py
@IDE     :PyCharm
@Author  :胖妞
@Date    :2022/5/15 13:31
"""
import json
import unittest

import requests
from ddt import ddt, file_data


@ddt
class Inter(unittest.TestCase):
    @file_data('api.yaml')
    def test_01_get_token(self, **kwargs):
        print(kwargs)
        url = kwargs['request']['url']
        params = kwargs['request']['params']
        headers = kwargs['request']['headers']
        resp = requests.get(url, params=params, headers=headers)
        print(resp.text)
        result_dict = json.loads(resp.text)
        # 预期结果
        # 'assert': {'eq': {'expires_in': 7200}}
        self.assertEqual(kwargs['assert']['eq']['expires_in'], result_dict['expires_in'])


if __name__ == '__main__':
    unittest.main()
2
3
4
5
6
7
8
9
10
11
12
13
14
15
16
17
18
19
20
21
22
23
24
25
26
27
28
29
30
31
32
33
34
config.yaml
User:
  age: 24
  name: 小睿
2
3
api.yaml
-
  name: 获取鉴权码接口
  request:
    url: https://api.weixin.qq.com/cgi-bin/token
    method: get
    headers:
      Accept: '*/*'
      Content-Type: 'application/json'
    params:
      grant_type: client_credential
      appid: wxcf90023b26f51211
      secret: 997b02c7551e854d7b6c69188d022098
  assert:
      eq:
        expires_in: 7200
2
3
4
5
6
7
8
9
10
11
12
13
14
15
# 结语
其实我感觉自动化测试中,接口测试是最好做的。web、app自动化,封装一些常用的方法,接下来就是寻找元素,控制元素,断言...
知识还是需要去用文字沉淀的。加油!
